- Always observe safety regulations when installing electrical equipment.
- Installation should be carried out by a licensed, qualified professional.
!! Important safety warning !!

- Never deal with electrical wires without first ensuring the mains power is switched off entirely or you will risk electric shock.
- Making any physical modifications to the device can result in a serious safety hazard.
Before you begin
Requirements:
- Use an insulated flat head electrical screwdriver for the screw terminals.
- The Neutral wire needs to be present in the wall switch box. If unavailable, you need to install this first.
- Ensure that the depth of the wall switch box is 35 mm or more and can accommodate the module.
- MEEK switches come with a protective foil. Peel this off only after your unit has been fully installed.
- Using the device through WiFi requires coverage. When used farther away from a WiFi router, use of repeaters or additional access points may be required.
Step 1: Physical installation.
Always ensure mains power is cut and confirm that there is no power present on the wires you might touch during installation.
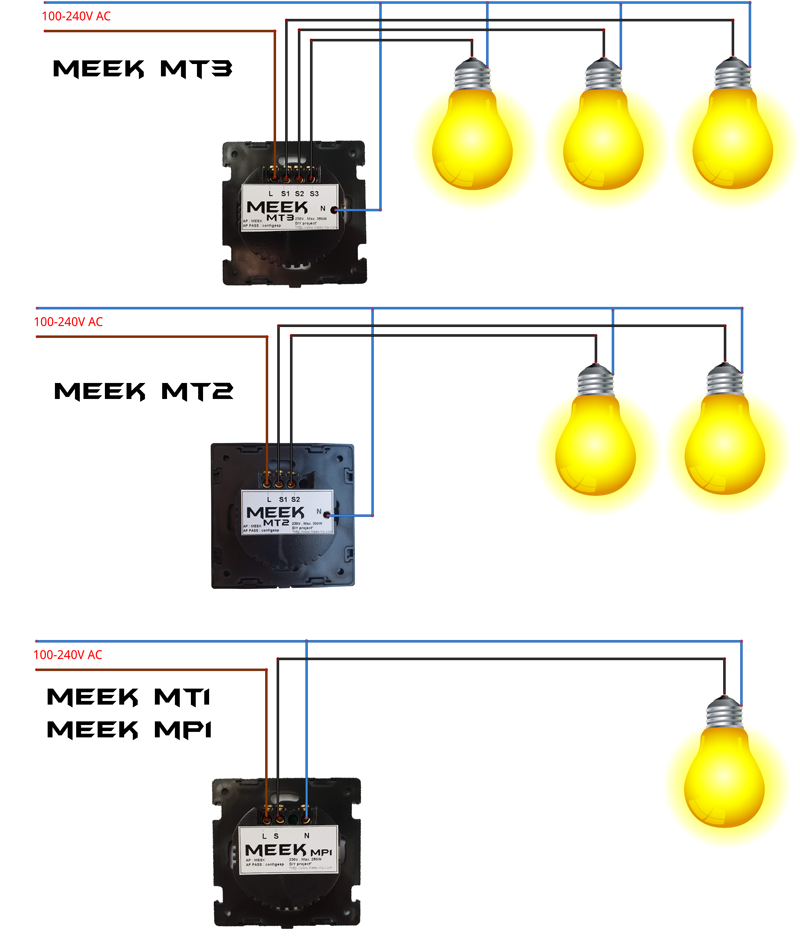
- Install the Neutral wire in the terminal labeled N, screw it down tightly and test that it will not release when pulled. Proceed with the Live wire, to be installed in the terminal labeled L. Finally, install the switched load(s) in the S terminal(s).
- The black cover is attached to the front glass plate. Gently detach the black cover from the device to reveal the mounting slots.
- Physically secure the device into the wall box by tightening the two screws normally included with your wall box (e.g. flat head M3 bolts).
- With little force, push the black cover plate back onto the installed switch.
- Turn the mains power back on and wait 15 seconds before testing the touch button. This will ensure the device can self calibrate. Touching it should toggle the
light/device. If the LED ring is white, it’s switched off and
if it’s colored the light should be on.
Step 2: Network setup.
- To setup your device ensure it is powered up. The LED-ring should be lit. If not, check if the installation is performed correctly.
- On a smartphone or computer, go to the WiFi settings and choose to join the network SSID starting with “ MEEK ”. When asked, enter the password “ configesp ”.
- Then use a browser, for instance Chrome, go to: http://192.168.4.1 Note: It is normal that the device will not respond on the former IP address anymore.
- Now, you can switch back to your own WiFi access point or router’s SSID.
- You can use your router’s web-interface to find out which IP the device receives or, alternatively, perform an IP scan to find the device.
- The web interface is usually located at 192.168.0.1 or 192.168.1.1. If it is different, try the same local IP address as your computer has and use 1 as the last number. From this interface there is often a LAN Overview. Search the list for MEEK or a new IP address which previously wasn’t present.
- For Android and iOS there are various Network scanners available. “Fing” is available for both Android and iOS and will find your device with its Hostname. This hostname will contain MEEK, making it easier to find your new device.
- Use this IP address in your browser for control and to further configure your device, or to add it to a home automation system.
Congratulations, your device is fully set up. You can now remove the protective foil from the Switch.